

It's been a few years since I have made kiddos size clothing. A few months ago my sister texted me the photo to the right. This is a dress I made for my niece's big sister when she was a toddler about 8 years ago! I have to admit, I teared up just a bit...this is why I sew.
The clothing, quilts and any handmade creation we make, is not only going to hold up like an heirloom, but it is also going to be cherished by the ones you love. It fills my heart to see my sister pass this dress down to another kiddo to wear and enjoy.
Then I thought, hey, I should make a couple more dresses for two of my nieces that are currently 2 years old. It's such a fun age, and clothes look so cute on them.

I heard about the The Geranium Dress pattern by Made by Rae , on a couple of podcasts, and I really wanted to try this pattern out. I purchased the main pattern in 0 - 5T size and the expansion pack with more add-on options. I love this pattern because it is so versatile and you can make a tunic, dress, different styles of sleeves, pleated or gathered skirt. It's really a pattern you can make over and over without feeling redundant.
The fabric is a very beautiful soft organic cotton. The fabric is from the Haiku 2 collection by Monaluna . The pink is called Poem Petal in Poplin, and the green is Poem Sage in Poplin. The gold dots in the fabric are a soft metallic - soooo pretty. I absolutely love this fabric design.
The pink dress was my first version of this dress. It took a couple days for me to complete the pink dress because I had to print, cut and tape the pattern pieces together first. I also reviewed all the options, finally settling on making View B with the contrast hem band. It turned out a cute maxi length, and leaves room for growth.

First Dress I made in View B with contrast hem band for maxi length

Second dress I made View A top and B skirt
I wanted to make the second dress in a different style, so I opted for the top in A, and I kept the pleated skirt so the large scale pattern didn't get distorted. If I had made the gathered skirt style, the pretty pattern would get lost in all of the fullness of the gathers. This is something to consider when making this dress. This dress came together very quickly - in one afternoon. I already had the pattern pieces ready and I was freshly familiar with the process.
Construction Tips
- Before pre-washing yardage: If you have a serger, do a 3 thread overlock stitch on the non-selvage sides. If you do not have a serger, do a zig zag stitch. This will eliminate threads raveling and eating into the yardage.

3 Thread overlock stitch on non selvage edges prior to washing fabric yardage

Fabric edges after being laundered. Edges have no raveling or loose threads
2. Fussy Cutting: The front bodice piece is supposed to be cut "on the fold". If you want a specific part of the fabric pattern to be centered on this piece, you will need to copy and tape the mirror part of that pattern piece to make a complete bodice pattern piece. Then either trace or cut around the full bodice pattern piece on the part of the fabric you want.
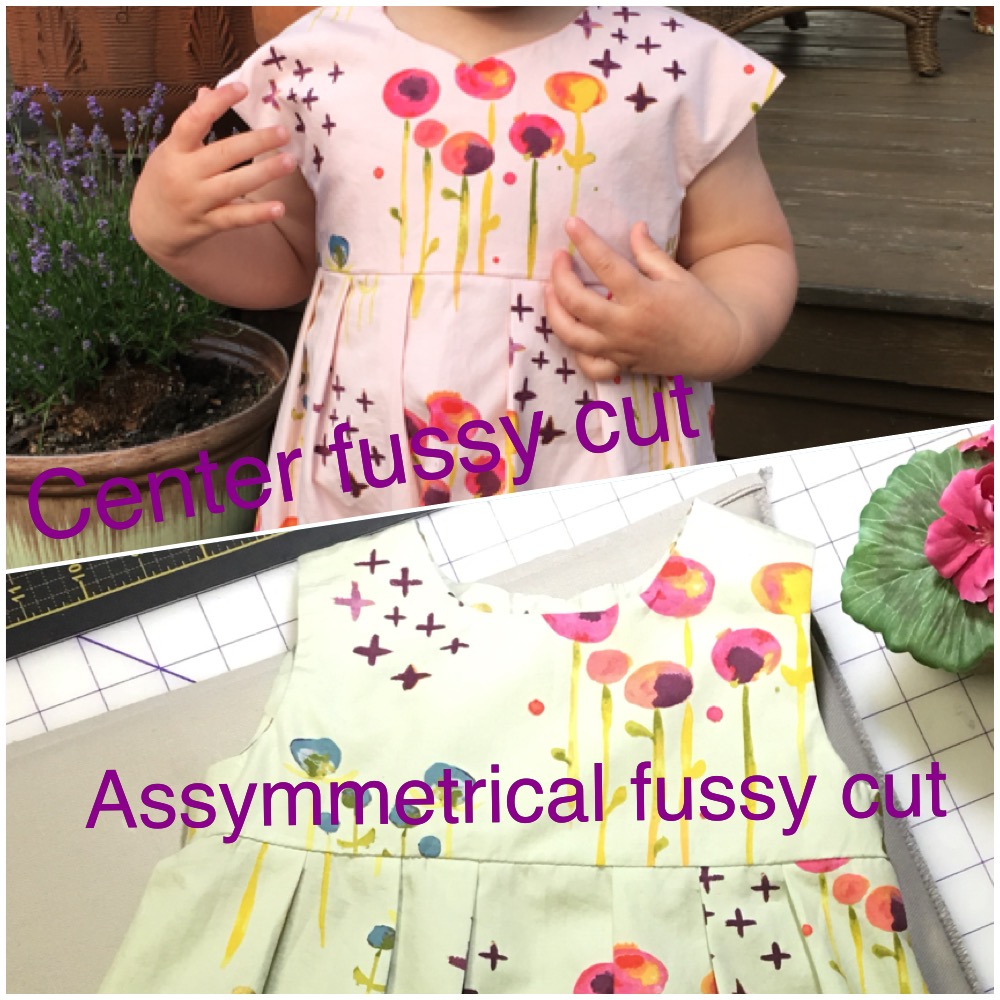
This fabric design lends itself to be centered or assymmetrical with equal visual interest to the eye

Fussy cutting from pattern traced onto fabric
3. Press up hem before sewing front to back pieces. It is much, much easier to press the hem up when its in a flat piece of fabric, than at the end when its in the round. This saves so much time and frustration.
“Tool tip... use a wooden “Clapper” after ironing for a crisp, smooth hem or seam allowance”

4. Hand stitch the lining to the bodice. The instructions give both machine sewing and hand sewing options to attache the lining to the bodice. I did the machine sewn lining in the pink dress (sorry, I forgot to photo this part on the pink dress), and hand stitched the lining in the green dress. They both look nice, but the green dress looks more "couture" and professional. It really does not take very long to hand stitch this lining, and I think it's worth the extra effort.

5. Button Holes: The directions indicate the placement of the button holes to start at same center point of button placement. I did this on the pink dress, and I thought there was too much fabric to the left of the button hole.
I placed the button holes 1/8" left of the center mark, and it was much better - I could've even done a 1/4" in, but didn't want it to be too close to the edge of the fabric.

Button hole tests
Of course, practice the button hole on scrap fabric before the real deal. I also put the button through the button hole to make sure it fits well, then I exhale and go for it on the dress. I do love the button hole foot and feature on my Bernina 820, which is the only part of the dress that I used my Bernina for.
I used my straight stitch Juki TL2010Q for the construction of the rest of the dress, and also my Babylock Ovation to overlock and trim the side seam allowances.
Overall, this dress was really fun to make. The dresses really fit well without alternations to the pattern - Yay!! You could definitely up the time and difficulty factor by adding details like ruffles, sleeves, zipper, hem band etc., but you also get endless options for totally different dresses and tunics from one pattern, and that is pretty awesome!
Let me know if you have made this dress before and if you like the pattern, and how you customized it.